
The art of creating pysanky is a long process and requires a steady hand, time, and patience. It begins with the selection of a clean smooth egg.
You will need a candle, beeswax, and a tool, called a ‘kistka'. The kistka is a small wooden dowel with a hole drilled through one end where a small copper funnel-like cone is inserted and wrapped securely by copper wiring.
The egg must be at room temperature. If the egg is cold or even cool, when the wax is applied, it can affect the outcome of your pysanky. Eggs, like our skin, are porous. When the egg is covered with wax it fills the pores preserving the color that has been applied. Beeswax is used in pysanky because it is a softer wax and will cling to the egg, unlike paraffin wax which will peel off of the egg surface.
The wax is inserted into the wide part of the funnel. Then the kistka is heated by direct contact to the candle. The design begins usually by encircling a line completely around the egg and it becomes a series of adding or connecting lines in a geometric pattern.
 |
 |
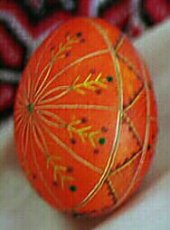 | ||||
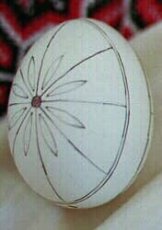
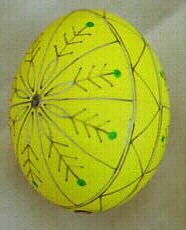
| STEP 1: Egg with pencil lines covered in beeswax. | STEP 2: Egg dipped in yellow dye and more design lines added. | STEP 3: Egg dipped in orange dye, more design lines added. |
After the basic design is penciled on the egg shell, cover with wax all parts of the design that you want to remain white. The egg is then put into the lightest color dye, usually yellow. When the egg is removed from the dye, everything under the wax will remain white because it is preserved by the wax on it. The rest of the designed egg will be yellow. The next step is to cover with wax everything you want to keep yellow. Then it is put into the next darker shade, usually orange and so on and so on until the egg shell is covered with wax. A pysanky can have as many as twenty different colors.
 |
 |
 | ||||
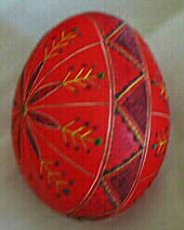
| STEP 4: Egg dipped in red dye,
next series of design lines added. |
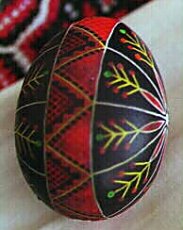
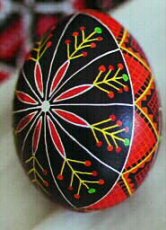
STEP 5: Egg dipped in black dye the finishing color). Egg is almost completely covered in wax. | STEP 6: Finished pysanky, wax removed. |
When finally complete, the egg is heated to the side of the candle until the wax begins to melt and is wiped away with a soft paper towel or clean rag to reveal the design underneath. The egg is then covered with many thin coats of varathane to protect it and give it a mirror-like finish.
HTML Translation, including ribbons and icons by GBarkman Art & Design © 2002 GBarkman.
Egg Images, Designs & Text © 2002 P. De Angelo.
"All Rights Reserved".